(NO ROOT!! ) Auto cast Android Device with internet in Ubuntu Using Scrcpy

Are you someone who uses their Android device to access the internet but doesn't have Wi-Fi access? Do you wish to control your Android device from your Ubuntu computer?
If yes, then Scrcpy is the perfect solution for you. In this blog post,
we'll guide you through the process of casting and controlling your Android device
on Ubuntu using Scrcpy. And luckily, this is a great software called Scrcpy
that makes this process a breeze.
What You Need
Hardware
- A computer running Ubuntu or another Linux distribution (tested on Ubuntu 22.04) but can work on other linux system also
- An Android device with a USB cable for connection
Software/Packages You Need to install (explain below) :
- Scrcpy : Source Link
- screen : Source Link
- adb : Source Link
Basic Setup :
Install these software from the given command :
Open the terminal in the Ubuntu system by pressing
Ctrl+Alt+t.Scrcpy : Install
scrcpyon your Ubuntu computer using the command :1sudo apt-get install scrcpyscreen : Install
screenon your Ubuntu computer using the command :1sudo apt-get install scrcpyadb : Install
adbon your Ubuntu computer using the command :1sudo apt-get install adb
Here are the steps for turning on USB debugging in different Android devices:
Stock Android (Click to expand):
Go to Settings > About Phone, then tap Build Number seven times to enable Developer Options. Go back to Settings > Developer Options, and toggle on --> USB debugging.Google Pixel/Nexus devices (Click to expand):
Go to Settings > About Phone, then tap Build Number seven times to enable Developer Options. Go back to Settings > System > Developer Options, and toggle on --> USB debugging.Samsung devices (Click to expand):
Go to Settings > About Phone, then tap Software Information. Tap Build Number seven times to enable Developer Options. Go back to Settings > Developer Options, and toggle on --> USB debugging.LG devices (Click to expand):
Go to Settings > About Phone, then tap Software Information. Tap Build Number seven times to enable Developer Options. Go back to Settings > Developer Options, and toggle on --> USB debugging.Motorola devices (Click to expand):
Go to Settings > About Phone, then tap Build Number seven times to enable Developer Options. Go back to Settings > Developer Options, and toggle on --> USB debugging.OnePlus devices (Click to expand):
Go to Settings > About Phone, then tap Build Number seven times to enable Developer Options. Go back to Settings > Developer Options, and toggle on --> USB debugging.Once you are done with
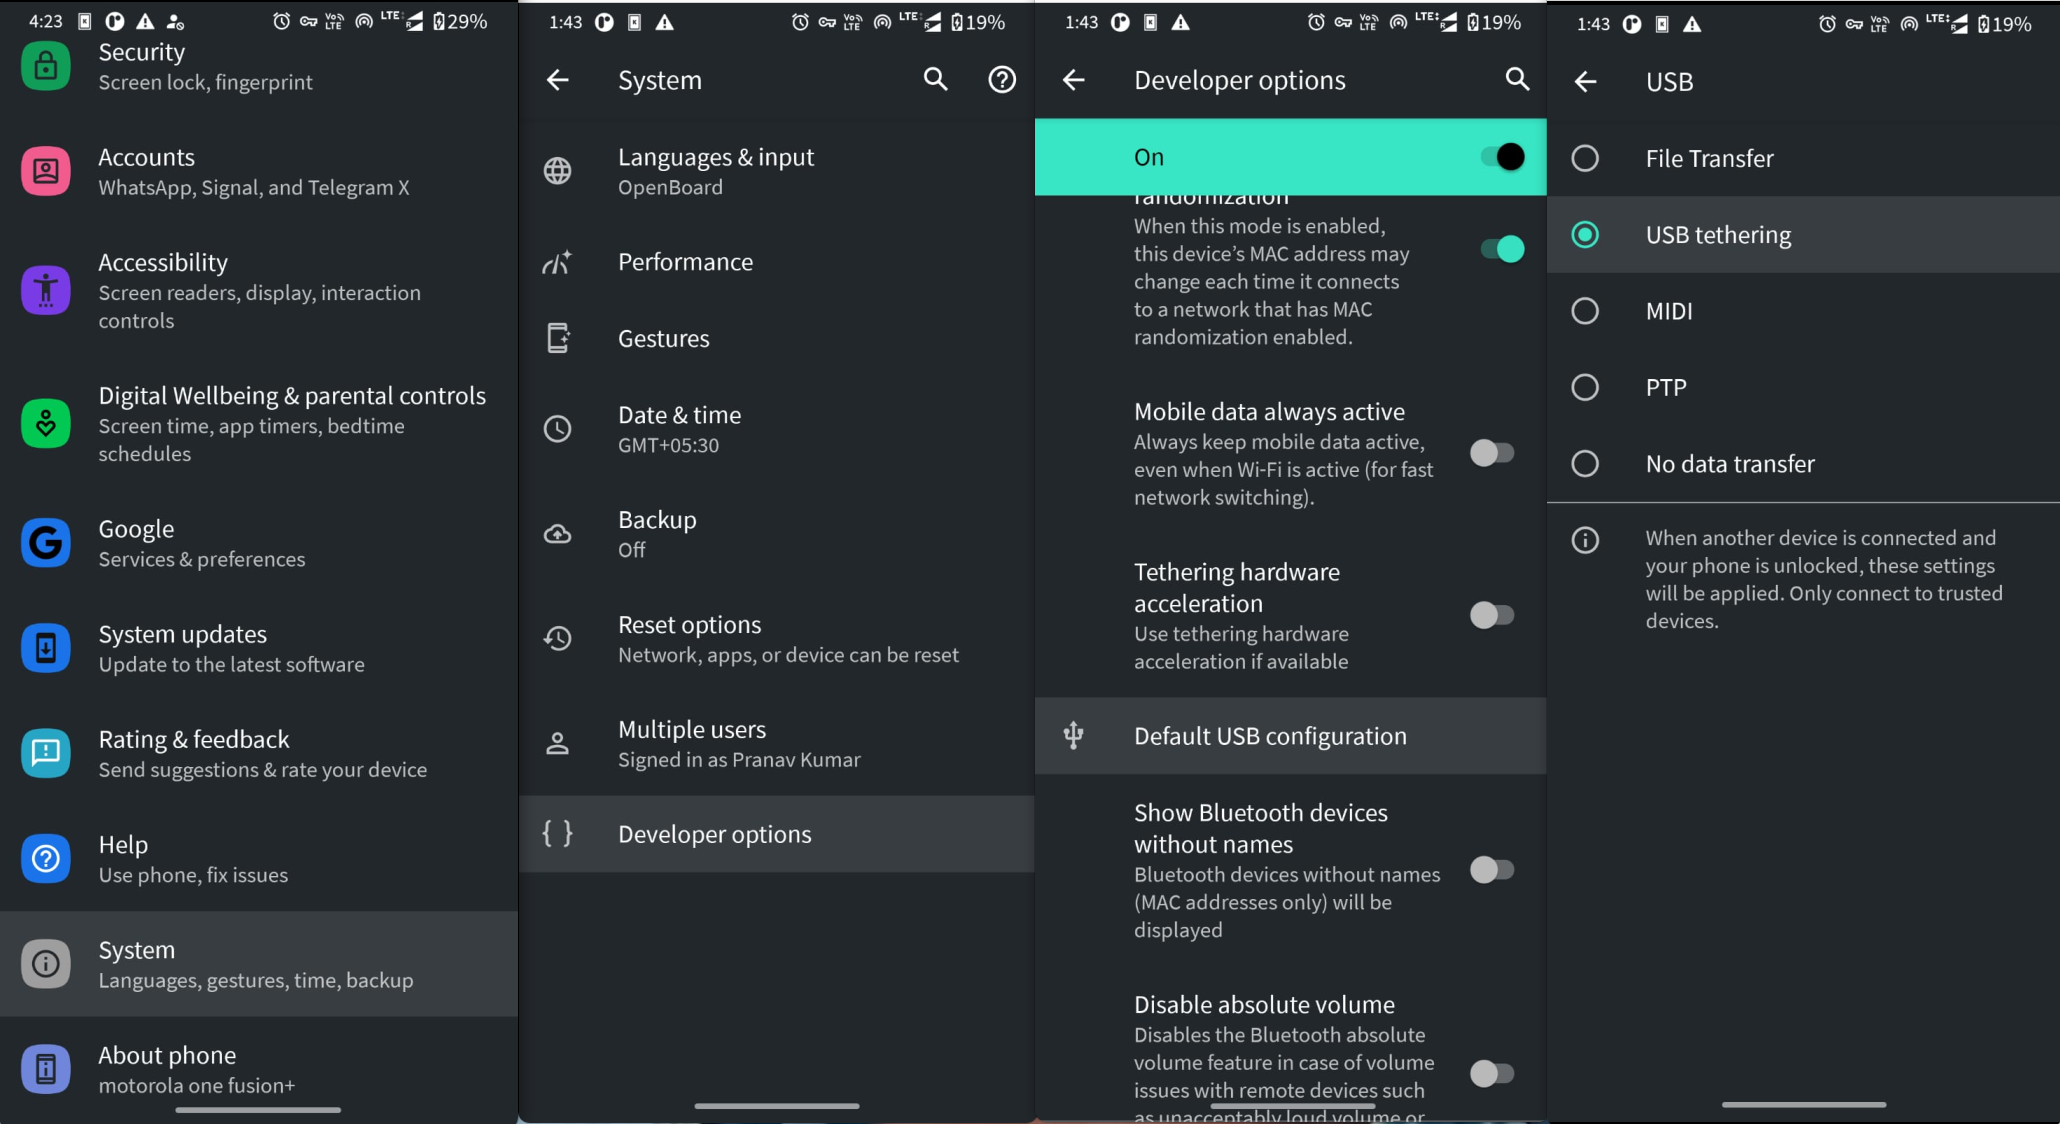
Step-2. Turn onUSB tetheringas default setting from the develop setting, follow these steps :Once Developer Options are enabled, go to Settings > System > Developer options.
Scroll down to the "Networking" section and enable the "USB configuration" option by.
Tap on the "USB configuration" option and select "USB tethering" from the list of options.
Now, whenever you connect the Android device to a computer via USB, USB tethering will be enabled by default.
REMEMBER: before connecting your android device to computer. It should be in unlock state.Note, that the exact steps and options may vary depending on the Android device and version of the operating system.

Follow these steps :
Open the terminal in the Ubuntu system by pressing
Ctrl+Alt+t.Make the
scrcpyexecutable bash script, Put command in the terminal :1cd Documents/ 2mkdir script 3nano auto_connect_scrcpy.shPaste this inside the
nanotext editor and save the file by pressingCtrl + sandCtrl + x:1#!/bin/bash 2sleep 2 3export XDG_RUNTIME_DIR=/run/user/$(id -u) 4export LD_LIBRARY_PATH=/usr/lib:/usr/lib64 5export XDG_RUNTIME_DIR=/run/user/$(id -u) 6 7scrcpy -V verbose --max-size 800 --disable-screensaver --legacy-paste -t -w --always-on-top 8sleep 2(Click to expand for code explanation):
Here's a breakdown of the different arguments being used:
export XDG_RUNTIME_DIR=/run/user/$(id -u): This line sets the
XDG_RUNTIME_DIRenvironment variable to the current user's runtime directory, which is used by many Linux applications to store runtime data. The $(id -u) command returns the current user's user ID, which is used to create a unique runtime directory for each user.export LD_LIBRARY_PATH=/usr/lib:/usr/lib64: This line sets the
LD_LIBRARY_PATHenvironment variable to include the system library paths for 64-bit and 32-bit libraries. This is useful for ensuring that the scrcpy software can access the necessary system libraries when running on the Linux operating system.export XDG_RUNTIME_DIR=/run/user/$(id -u): This line sets the
XDG_RUNTIME_DIRenvironment variable again, likely as a redundant measure to ensure that it is correctly set.scrcpy -V verbose --max-size 800 --disable-screensaver --legacy-paste -t -w --always-on-topscrcpy: This is the command used to launch the scrcpy software.
-V verbose: This argument enables verbose logging, which provides more detailed output during the execution of the script.
--max-size 800: This argument sets the maximum display size of the Android device being cast to 800 pixels. This is useful for limiting the size of the device's display to fit within the available screen real estate on the computer.
--disable-screensaver: This argument disables the screensaver on the computer, preventing the display from turning off during use.
--legacy-paste: This argument enables the use of legacy paste functionality. This is useful for users who are experiencing issues with clipboard functionality when copying and pasting text between the Android device and the computer.
-t: This argument enables touch events on the Android device, allowing the user to interact with the device via the computer's mouse and keyboard.
-w: This argument sets the window mode to "windowed", which displays the Android device in a separate window on the computer screen.
--always-on-top: This argument keeps the Android device window always on top of other windows on the computer screen, ensuring that it remains visible and easily accessible.
Make the above bash script executable by putting this command:
1chmod +x auto_connect_scrcpy.shPut these command in the terminal :
1nano Documents/script/virtual_terminal.shPaste this inside the
nanotext editor ans save the file by pressingCtrl + sandCtrl + x:1#!/bin/bash 2/bin/bash -c '/home/mighty/Documents/script/auto_connect_scrcpy.sh; exec bash'Make the above bash script executable by putting this command:
1chmod +x virtual_terminal.sh
Once these above step are done, Now, we have to configure the
udev rulefor the android system in the Ubuntu system. So, that whenever we connect the android device it will trigger the custom script.Follow these steps :
First, find the id of your
android device. Typelsusbin the terminal:1lsusb

- In that list my device
ATTR{idVendor}=="22b8"is, we will use in udev script:

Now we know our device id, Make the
udevscript, Open the terminal in the Ubuntu system by pressingCtrl+Alt+tand type/paste.1sudo nano /etc/udev/rules.d/71-udev-rule.rulesPaste this inside the
nanotext editor and save the file by pressingCtrl + sandCtrl + x:1SUBSYSTEM=="usb", ATTR{idVendor}=="<your id vendor>", RUN+="/bin/su -c '/usr/bin/Xvfb :1 -screen 0 1024x768x16 & /usr/bin/screen -dmS myscript /usr/bin/bash -c \"export DISPLAY=:1; export XAUTHORITY=/home/<your username>/.Xauthority; /home/<your username>/Documents/script/virtual_terminal.sh\"' <your username>"Here
<your id vendor>is"22b8"(form previous step) To get your<your username>, Open terminal and type :1whoamiExpected output :

the above script will look something like this :
1SUBSYSTEM=="usb", ATTR{idVendor}=="22b8", RUN+="/bin/su -c '/usr/bin/Xvfb :1 -screen 0 1024x768x16 & /usr/bin/screen -dmS myscript /usr/bin/bash -c \"export DISPLAY=:1; export XAUTHORITY=/home/mighty/.Xauthority; /home/mighty/Documents/script/virtual_terminal.sh\"' mighty"
- Now once done with the above steps, type this to reload the udev rules :
1sudo udevadm control --reload-rules # reload udev rules
2sudo service udev restart # restart the udev
- Reconnect your android usb device you will see the output like this :
Conclusion :
One of the best features of scrcpy is its auto-connect functionality. This means that whenever you connect your Android device to your computer, scrcpy will automatically launch and begin displaying your device on your screen. This saves you time and hassle and makes it even more convenient to use your phone as an internet source with USB tethering turn on.
Overall, scrcpy is a fantastic tool for anyone who wants to cast and control their Android device from their Ubuntu system. With its easy installation, automatic connection, and customizable display settings, it's the perfect solution for people who need to use their phone for internet access but don't want to deal with the limitations of a small screen or touchscreen typing.