LVGL hardware button setup
Arduino Esp32 LVGL lv_arduino Hardware_button st7735s
This setup guide is made using the following hardware and software
Hardware Components And Supplies :-
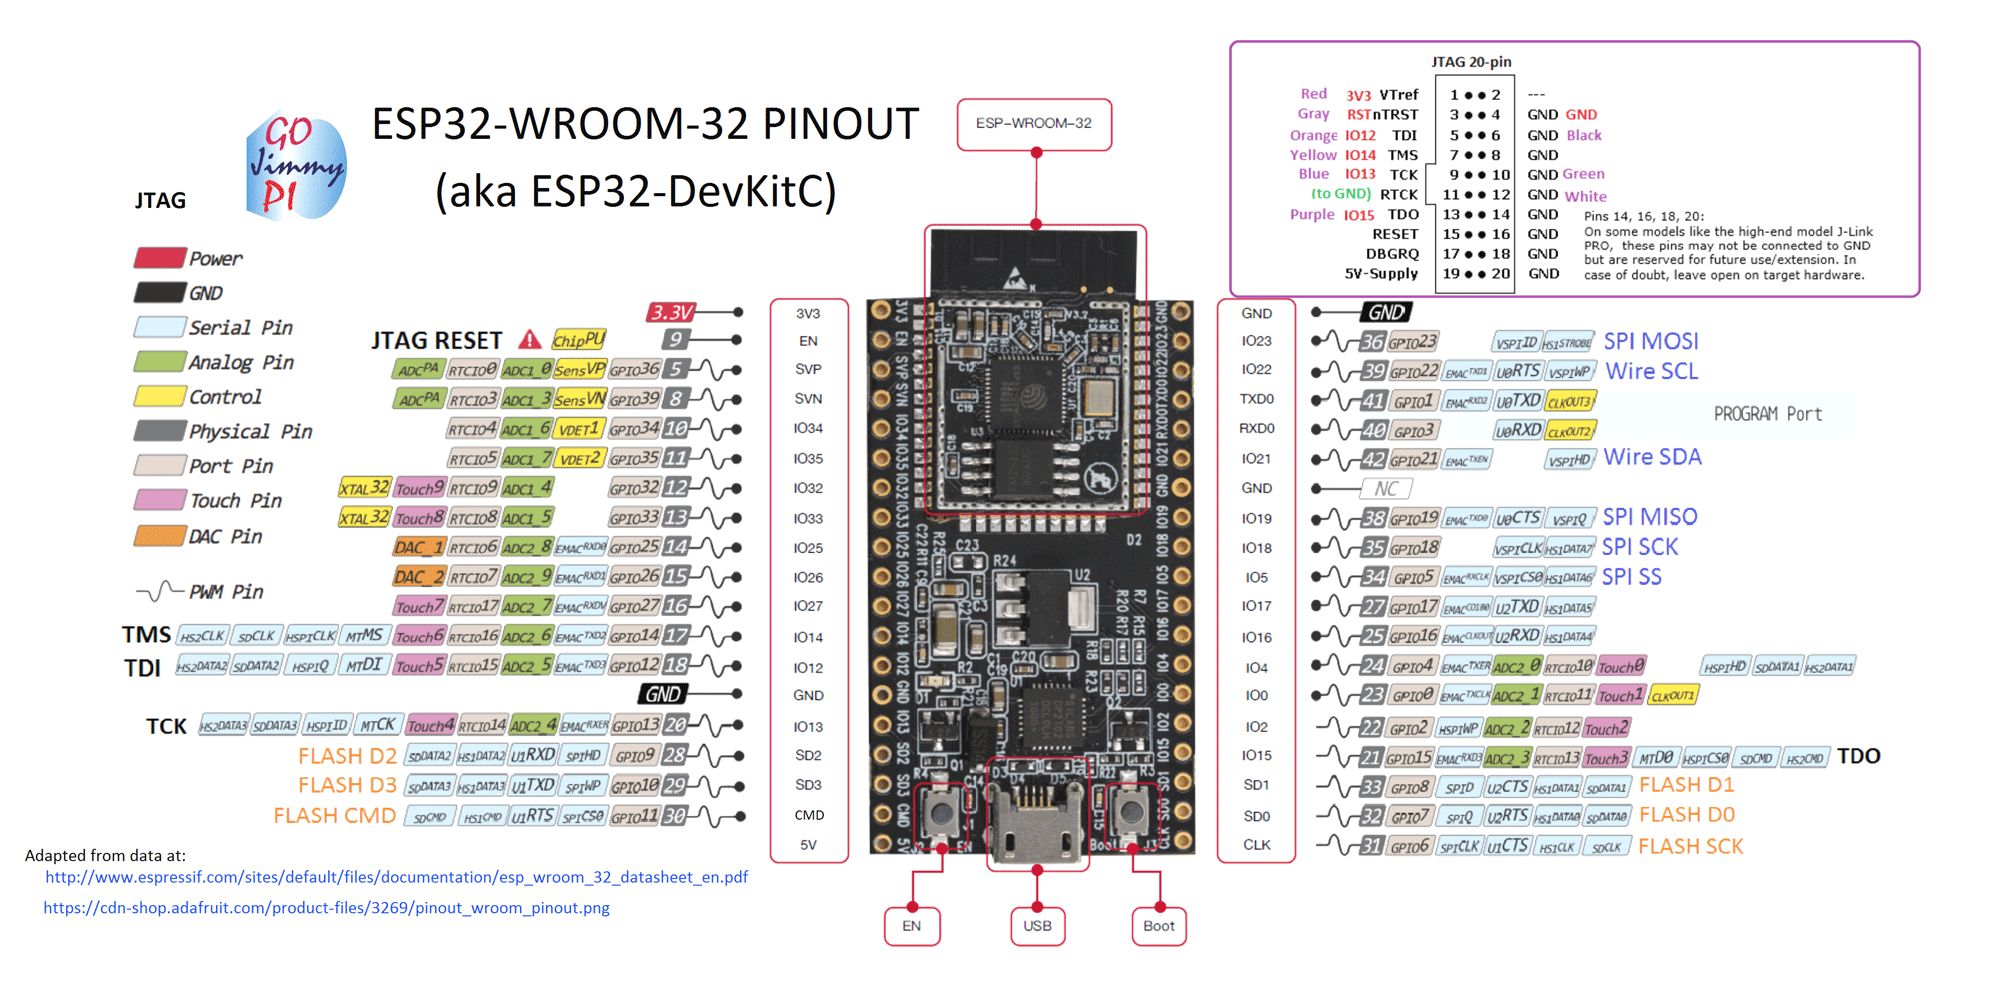
- Esp32 Dev Module
- ST7735s 1.8" TFT Display 128 x 160
- USB Cable to upload the code
- Jumper Cable (Male to Male)
- BreadBoard
- Push button or Capacitive touch button
Software Used in the project :
- PlatformIO
- Vscode
- esp32 Framework: Arduino
- lvgl/lv_arduino@2.1.5
- bodmer/TFT_eSPI@^2.3.59
- greiman/SdFat@^2.0.4
- lvgl/lvgl@^7.10.0
- lvgl/lv_examples@^7.10.0
It is easier to download the required library from the platformIO library section from its home page.
Note:- It is recommended to go with that version of the library as it is tested on the system and it is working properly. And please go through the Display SETUP guide once.
Introduction:
The main aim of this project is to able to run the LVGL library on the st7735s 128 x 160 TFT display with using esp32 and configure multiple button input from the different GPIO of the ESP32 and pass that data command to the screen fuctionality. I am driving my system in the landscape mode you can go with portrait mode also but you to configure the setting properly. If faces any problen on the screen setup go to the previous guide of lvgl screen Setup. In this setup , I have put total of 8 button from the esp32 which are both input and touch configurable in the esp32 board
Earlier Tested : 1. Earlier I tested the blog for setting and registring the button on the lvgl, from this Guide some functions depriciated in the guide.
- But unforunately that guide have setup defined on the stm32 board and also itis for the older version of the lvgl and some of the fuction are depriciated in the newer version of the lvgl.
putting the Setup
Step 1:Create a new project in platformIO and Do the connection of the esp32 with Capacitive touch button are as follows:

$$\text{Capacitive Touch sensor}$$

$$\text{Capacitive Touch sensor setup}$$

$$\text{ESP32 dev Board }$$
System Connections:
| Sl No. | Capacitive Touch Signal pin | ESP32 | Description |
|---|---|---|---|
| 1. | Button_1 | 27 | Capacitive touch button |
| 2. | Button_2 | 14 | Capacitive touch button |
| 3. | Button_3 | 12 | Capacitive touch button |
Step 2: Now do the following setup in the downloaded library as in my case i used PlatformIO so i will go to :{your platformIO project name}/.pio/libdeps/esp32dev/TFT_eSPI/User_Setup.h
and for the Arduino IDE go to /home/{USERNAME}/Arduino/libraries/TFT_eSPI/User_Setup.h
So either you can comment everything their and put these lines or read the file uncomment these changes in the User_Setup.h.
Step 2: Now go to the {your platformIO project name}/.pio/libdeps/esp32dev/lv_arduino/lv_conf.h and for the Arduino IDE go to /home/{USERNAME}/Arduino/libraries/.pio/libdeps/esp32dev/lv_arduino/lv_conf.h and do the following changes :
 1/* Input device read period in milliseconds */
 2#define LV_INDEV_DEF_READ_PERIOD          30            // for button till 20ms is recommended
 3/* Long press time in milliseconds.
 4 * Time to send `LV_EVENT_LONG_PRESSED`) */
 5#define LV_INDEV_DEF_LONG_PRESS_TIME      400           // if long press required
 6/* Repeated trigger period in long press [ms]
 7 * Time between `LV_EVENT_LONG_PRESSED_REPEAT */
 8#define LV_INDEV_DEF_LONG_PRESS_REP_TIME  100
 9
10// enable log settings
11#define LV_USE_LOG      1
12#  define LV_LOG_LEVEL     LV_LOG_LEVEL_INFO            // easy for debugging
13#  define LV_LOG_PRINTF   1
Step 3: Now go to the {your platformIO project name}/.pio/libdeps/esp32dev/lvgl/examples/porting folder and for the Arduino IDE go to /home/{USERNAME}/Arduino/libraries/.pio/libdeps/esp32dev/lvgl/examples/porting and do the following changes :
- and copy the file name
lv_port_indev_template.caslv_port_indev.candlv_port_indev_template.haslv_port_indev.hin the folder namelv_port_indevin your local lib folder in the PlatformIO or in the skechbook folder of the Arduino IDE. - Now open the
lv_port_indev.hfile and remove with following lines:1 /** 2 * @file lv_port_indev.h 3 * 4 */ 5 6 /*Copy this file as "lv_port_indev.h" and set this value to "1" to enable content*/ 7 #if 1 8 9 #ifndef LV_PORT_INDEV_H 10 #define LV_PORT_INDEV_H 11 12 #ifdef __cplusplus 13 extern "C" { 14 #endif 15 16 /********************* 17 * INCLUDES 18 *********************/ 19 /********************* 20 * DEFINES 21 *********************/ 22 #define BUTTON_1 27 // GPIO from esp32 dev module 23 #define BUTTON_2 14 // GPIO from esp32 dev module 24 #define BUTTON_3 12 // GPIO from esp32 dev module 25 /********************** 26 * TYPEDEFS 27 **********************/ 28 typedef struct 29 { 30 const char pin_name[15]; 31 int8_t pin_no; 32 int8_t button_no; 33 volatile bool pin_state; 34 int8_t pin_mode; 35 bool pin_last_state; 36 }buttons_c; 37 38 /********************** 39 * GLOBAL PROTOTYPES 40 **********************/ 41 void lv_port_indev_init(void); 42 /********************** 43 * MACROS 44 **********************/ 45 46 #ifdef __cplusplus 47 } /* extern "C" */ 48 #endif 49 50 #endif /*LV_PORT_INDEV_TEMPL_H*/ 51 52 #endif /*Disable/Enable content*/ - Now open the
lv_port_indev.cfile and add the following lines:1 //enable the content 2 #if 1 3 4 /********************* 5 * INCLUDES 6 *********************/ 7 // include the header file 8 #include <Arduino.h> 9 # include <lv_examples.h> 10 #include "lv_port_indev.h" 11 /********************* 12 DEFINES 13 *********************/ 14 buttons_c buttons [] = { 15 {.pin_name = "BUTTON_1 " , .pin_no = BUTTON_1 , .button_no = 1}, 16 {.pin_name = "BUTTON_2 " , .pin_no = BUTTON_2 , .button_no = 2}, 17 {.pin_name = "BUTTON_3 " , .pin_no = BUTTON_3 , .button_no = 3} 18 }; 19 // in the fuction void lv_port_indev_init(void) 20 /*Assign buttons to points on the screen change according to your preference*/ 21 static const lv_point_t btn_points[(sizeof(buttons) / sizeof(buttons_c))] = { 22 { 80, 25}, /*Button 1 at cordinate on screen -> x:80; y:10*/ 23 { 80, 85}, /*Button 2 at cordinate on screen -> x:80; y:30*/ 24 { 80, 50}, /*Button 3 at cordinate on screen -> x:80; y:50*/ 25 } 26 // in the fuction static void button_init(void) 27 /* Initialize your buttons */ 28 static void button_init(void) 29 { 30 uint8_t i; 31 for(i = 0; i < sizeof(buttons) / sizeof(buttons_c); i++) 32 { 33 pinMode(buttons[i].pin_no, buttons[i].pin_mode = INPUT); 34 buttons[i].pin_state = digitalRead(buttons[i].pin_no); 35 buttons[i].pin_last_state = buttons[i].pin_state; 36 buttons[i].pin_last_state = -1; 37 } 38 } 39 // in the fuction static int8_t button_get_pressed_id(void) 40 /*Get ID (1- 3) of the pressed button*/ 41 static int8_t button_get_pressed_id(void) 42 { 43 uint8_t i; 44 for(i = 0; i < sizeof(buttons) / sizeof(buttons_c); i++) 45 { 46 buttons[i].pin_last_state = buttons[i].pin_state; 47 buttons[i].pin_state = digitalRead(buttons[i].pin_no); 48 if(button_is_pressed(buttons[i].pin_state)) 49 return buttons[i].button_no; // return button no. 50 } 51 /*No button pressed*/ 52 return -1; 53 } 54 55 /*Test if `id` button is pressed or not*/ 56 static bool button_is_pressed(uint8_t id) 57 { 58 if(id) 59 return true; 60 return false; 61 }
Step 4: Now open a new file in PlatformIO from the src folder like main.cpp or in the ArduinoIDE open up a main file which contain the void setup() fuction and do these changes:
1    // include the following library
2    #include <Arduino.h>
3    #include <lvgl.h>
4    #include <main.h>
5    #include <TFT_eSPI.h>
6    #include <lv_examples.h>
7    #include "../lib/lv_port_indev/lv_port_indev.h"
And in void setup() fuction add this after display driver initialization :
1    lv_disp_drv_register(&disp_drv);
2
3    /* Try an example from the lv_examples repository
4		 * https://github.com/lvgl/lv_examples*/
5    lv_port_indev_init();   // add this line
6    lv_ex_btn_1();          // calling from lv_example
Step 6: Now upload the program to your ESP32. Here is the content of platformio.ini file:
 1    [env:esp32dev]
 2    platform = espressif32
 3    board = esp32dev
 4    framework = arduino
 5    monitor_speed = 115200
 6    monitor_port = /dev/ttyUSB0
 7    lib_deps =
 8        lvgl/lv_arduino@2.1.5
 9        bodmer/TFT_eSPI@^2.3.59
10        greiman/SdFat@^2.0.4
11        lvgl/lvgl@^7.10.0
12        lvgl/lv_examples@^7.10.0
Conclusion: The whole output should look somthing like this and The above code should generate this result:

This is some other example running :

Note: Below is the example of wrong configuration.e.g, in the step 3
1#define LV_HOR_RES_MAX          (100) or //10
2#define LV_VER_RES_MAX          (100) or //10
Reference Note:
- wrong decleration problem : issue
- ESP DEBUGGER and follow this istallation guide
- lvgl event handler guide
Help in improving the guide
Thanks Futuristic Labs Pvt. Ltd. for providing me the resources of the project.
Please if you find any useful improvement feel free to contact at : @pranav083 or comment below.