LVGL esp32 setup
Arduino Esp32 LVGL lv_arduino lv_examples st7735s
This setup guide is made using the following hardware and software
Hardware Components And Supplies :
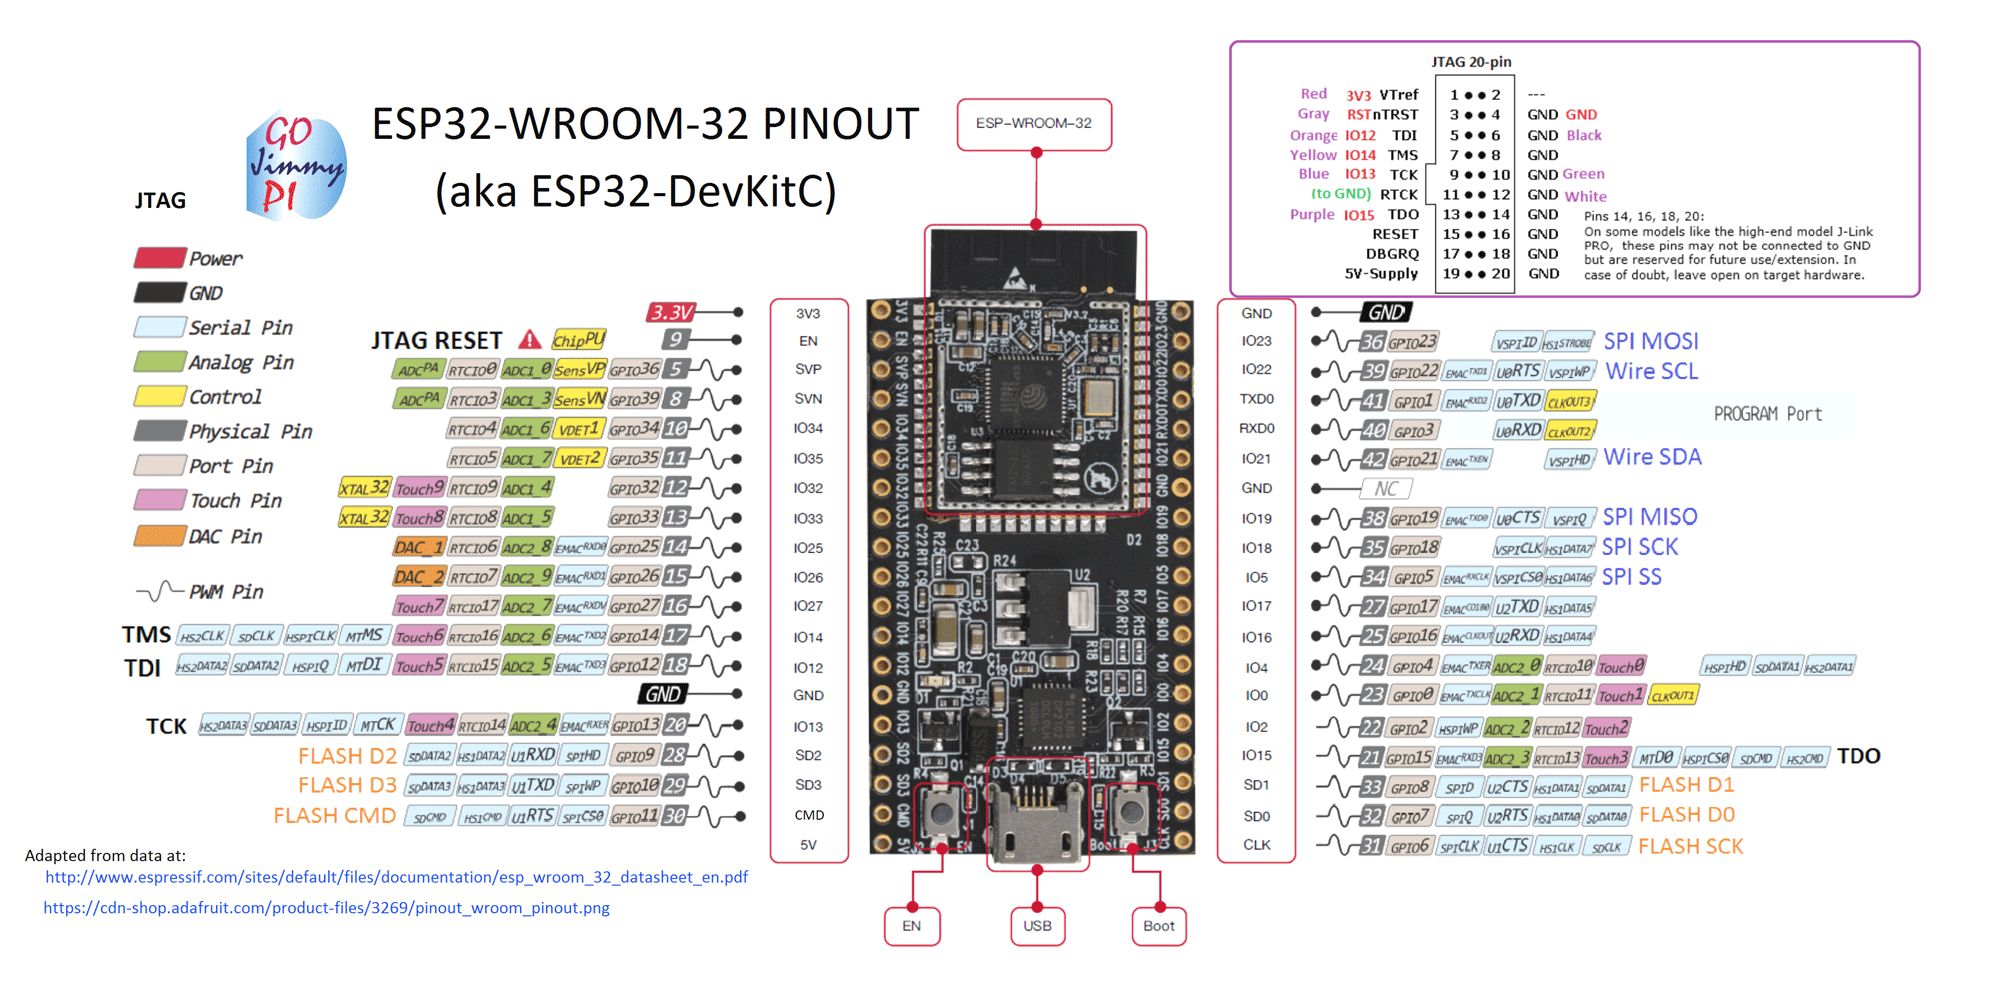
- Esp32 Dev Module
- ST7735s 1.8" TFT Display 128 x 160
- USB Cable to upload the code
- Jumper Cable (Male to Male)
- BreadBoard
Software Used in the project :
- PlatformIO
- Vscode
- esp32 Framework: Arduino
- lvgl/lv_arduino@2.1.5
- bodmer/TFT_eSPI@^2.3.59
- greiman/SdFat@^2.0.4
- lvgl/lvgl@^7.10.0
- lvgl/lv_examples@^7.10.0
It is easier to download the required library from the platformIO library section from its home page.
Note:- It is recommended to go with that version of the library as it is tested on the system and it is working properly.
Introduction:
The main aim of this project is to able to run the LVGL library on the st7735s 128 x 160 TFT display with using esp32. I am driving my system in the landscape mode you can go with portrait mode also but you to configure the setting properly(onward step 3).
Earlier Tested : I had tried to test with the Adafruit TFT library but it seems like their are lot of breaking changes in the library and it was not able to work properly. So, finally I decided to go with the generic library for the display st7735s.
Learning
Step 1:Create a new project in platformIO and Do the connection of the esp32 with the st7735s as follows:
| Sl No. | ST7735s | ESP32 | Description |
|---|---|---|---|
| 1. | LED | 5v | LED Source |
| 2. | SCK/TFT_SCLK | 18 | Clock(SPI) |
| 3. | SDA/TFT_MISO | 19 | DATA (SPI) |
| 4. | A0/DC /TFT_DC | 25 | Data Command control pin |
| 5. | RESET /TFT_RST | 4 | Reset pin |
| 6. | CS /TFT_CS | 26 | Chip select control pin |
| 7. | GND | GND | Ground |
| 8. | VCC | 5v | Display source |


Step 2: * Now do the following setup in the downloaded library as in my case i used PlatformIO so i will go to :{your platformIO project name}/.pio/libdeps/esp32dev/TFT_eSPI/User_Setup.h
and for the Arduino IDE go to /home/{USERNAME}/Arduino/libraries/TFT_eSPI/User_Setup.h
 1    #define ST7735_DRIVER
 2    #define TFT_RGB_ORDER TFT_RGB  // Colour order Red-Green-Blue
 3    #define TFT_WIDTH  128
 4    #define TFT_HEIGHT 160
 5    #define ST7735_GREENTAB
 6    #define TFT_MISO 19
 7    #define TFT_MOSI 23
 8    #define TFT_SCLK 18
 9    #define TFT_CS   26  // Chip select control pin
10    #define TFT_DC    25  // Data Command control pin
11    #define TFT_RST   4  // Reset pin (could connect to RST pin)
12    #define LOAD_GLCD   // Font 1. Original Adafruit 8 pixel font needs ~1820 bytes in FLASH
13    #define LOAD_FONT2  // Font 2. Small 16 pixel high font, needs ~3534 bytes in FLASH, 96 characters
14    #define LOAD_FONT4  // Font 4. Medium 26 pixel high font, needs ~5848 bytes in FLASH, 96 characters
15    #define LOAD_FONT6  // Font 6. Large 48 pixel font, needs ~2666 bytes in FLASH, only characters 1234567890:-.apm
16    #define LOAD_FONT7  // Font 7. 7 segment 48 pixel font, needs ~2438 bytes in FLASH, only characters 1234567890:-.
17    #define LOAD_FONT8  // Font 8. Large 75 pixel font needs ~3256 bytes in FLASH, only characters 1234567890:-.
18    //#define LOAD_FONT8N // Font 8. Alternative to Font 8 above, slightly narrower, so 3 digits fit a 160 pixel TFT
19    #define LOAD_GFXFF  // FreeFonts. Include access to the 48 Adafruit_GFX free fonts FF1 to FF48 and custom fonts
20
21    // Comment out the #define below to stop the SPIFFS filing system and smooth font code being loaded
22    // this will save ~20kbytes of FLASH
23    #define SMOOTH_FONT
24    #define SPI_FREQUENCY  27000000
25    #define SPI_READ_FREQUENCY  20000000
26    #define SPI_TOUCH_FREQUENCY  2500000
So either you can comment everything their and put these lines or read the file uncomment these changes in the User_Setup.h.
Step 3: Now go to the {your platformIO project name}/.pio/libdeps/esp32dev/lv_arduino/lv_conf.h and for the Arduino IDE go to /home/{USERNAME}/Arduino/libraries/.pio/libdeps/esp32dev/lv_arduino/lv_conf.h and do the following changes :
 1#if 1 /*Set it to "1" to enable content*/
 2/* this is the setting i found by doing a lot of testing
 3otherwise the screen came to be blury you can play with
 4your optimal value if not working fine*/
 5/* Maximal horizontal and vertical resolution to support by the library.*/
 6#define LV_HOR_RES_MAX          (50)
 7#define LV_VER_RES_MAX          (50)
 8#define LV_COLOR_DEPTH           16
 9#define LV_DPI                   114     /*[px]*/
10#define LV_TICK_CUSTOM           1
11#define LV_USE_USER_DATA         1
12// and do not cnange the rest of the file
Step 4: Now go to the {your platformIO project name}/.pio/libdeps/esp32dev/lvgl/lv_conf_template.h and for the Arduino IDE go to /home/{USERNAME}/Arduino/libraries/.pio/libdeps/esp32dev/lvgl/lv_conf_template.h and do the following changes :
- First change the name of the file from
lv_conf_template.htolv_conf.h - Now do the following changes to the file:
1#if 1 /*Set it to "1" to enable content*/
2/* Maximal horizontal and vertical resolution to support by the library.*/
3#define LV_HOR_RES_MAX          (128)
4#define LV_VER_RES_MAX          (160)
5#define LV_COLOR_DEPTH           16
6#define LV_DPI                   114     /*[px]*/
Step 5: Now open a new file in PlatformIO from the src folder like main.cpp or in the ArduinoIDE open up a new file and put this content.
 1#include <Arduino.h>
 2#include <lvgl.h>
 3#include <TFT_eSPI.h>
 4#include <lv_examples.h>
 5
 6TFT_eSPI tft = TFT_eSPI(); /* TFT instance */
 7static lv_disp_buf_t disp_buf;
 8static lv_color_t buf[LV_HOR_RES_MAX * 10];
 9
10#if USE_LV_LOG != 0
11/* Serial debugging */
12void my_print(lv_log_level_t level, const char * file, uint32_t line, const char * dsc)
13{
14    Serial.printf("%s@%d->%s\r\n", file, line, dsc);
15    Serial.flush();
16}
17#endif
18
19/* Display flushing */
20void my_disp_flush(lv_disp_drv_t *disp, const lv_area_t *area, lv_color_t *color_p)
21{
22    uint32_t w = (area->x2 - area->x1 + 1);
23    uint32_t h = (area->y2 - area->y1 + 1);
24    tft.startWrite();
25    tft.setAddrWindow(area->x1, area->y1, w, h);
26    tft.pushColors(&color_p->full, w * h, true);
27    tft.endWrite();
28    lv_disp_flush_ready(disp);
29}
30
31void setup()
32{
33    Serial.begin(115200); /* prepare for possible serial debug */
34    lv_init();
35
36#if USE_LV_LOG != 0
37    lv_log_register_print_cb(my_print); /* register print function for debugging */
38#endif
39
40    tft.begin(); /* TFT init */
41    tft.setRotation(1); //for landscape
42
43    lv_disp_buf_init(&disp_buf, buf, NULL, LV_HOR_RES_MAX * 5);
44
45    /*Initialize the display*/
46    lv_disp_drv_t disp_drv;
47    lv_disp_drv_init(&disp_drv);
48    disp_drv.hor_res = 160;
49    disp_drv.ver_res = 128;
50    disp_drv.flush_cb = my_disp_flush;
51    disp_drv.buffer = &disp_buf;
52    lv_disp_drv_register(&disp_drv);
53
54		/* Try an example from the lv_examples repository
55		 * https://github.com/lvgl/lv_examples*/
56		lv_ex_btn_1();
57}
58
59void loop()
60{
61    lv_task_handler(); /* let the GUI do its work */
62    delay(5);
63}
Step 6: Now upload the program to your ESP32. Here is the content of platformio.ini file:
 1[env:esp32dev]
 2platform = espressif32
 3board = esp32dev
 4framework = arduino
 5lib_deps =
 6	lvgl/lv_arduino@2.1.5
 7	bodmer/TFT_eSPI@^2.3.59
 8	greiman/SdFat@^2.0.4
 9	lvgl/lvgl@^7.10.0
10	lvgl/lv_examples@^7.10.0
Conclusion: The whole output should look somthing like this:

1#define LV_HOR_RES_MAX          (100) or //10
2#define LV_VER_RES_MAX          (100) or //10

Help in improving the guide
Thanks Futuristic Labs Pvt. Ltd. for providing me the resources of the project. Please if you find any useful improvement feel free to contact at : @pranav083 or comment below.