LVGL ESP32 Setup Guide
LVGL ESP32 Setup: Building Beautiful UIs on Embedded Displays
Quick Start Guide: Learn how to integrate LVGL graphics library with ESP32 and ST7735S TFT display for creating modern, responsive user interfaces.
Hardware Requirements
| Component | Description | Link |
|---|---|---|
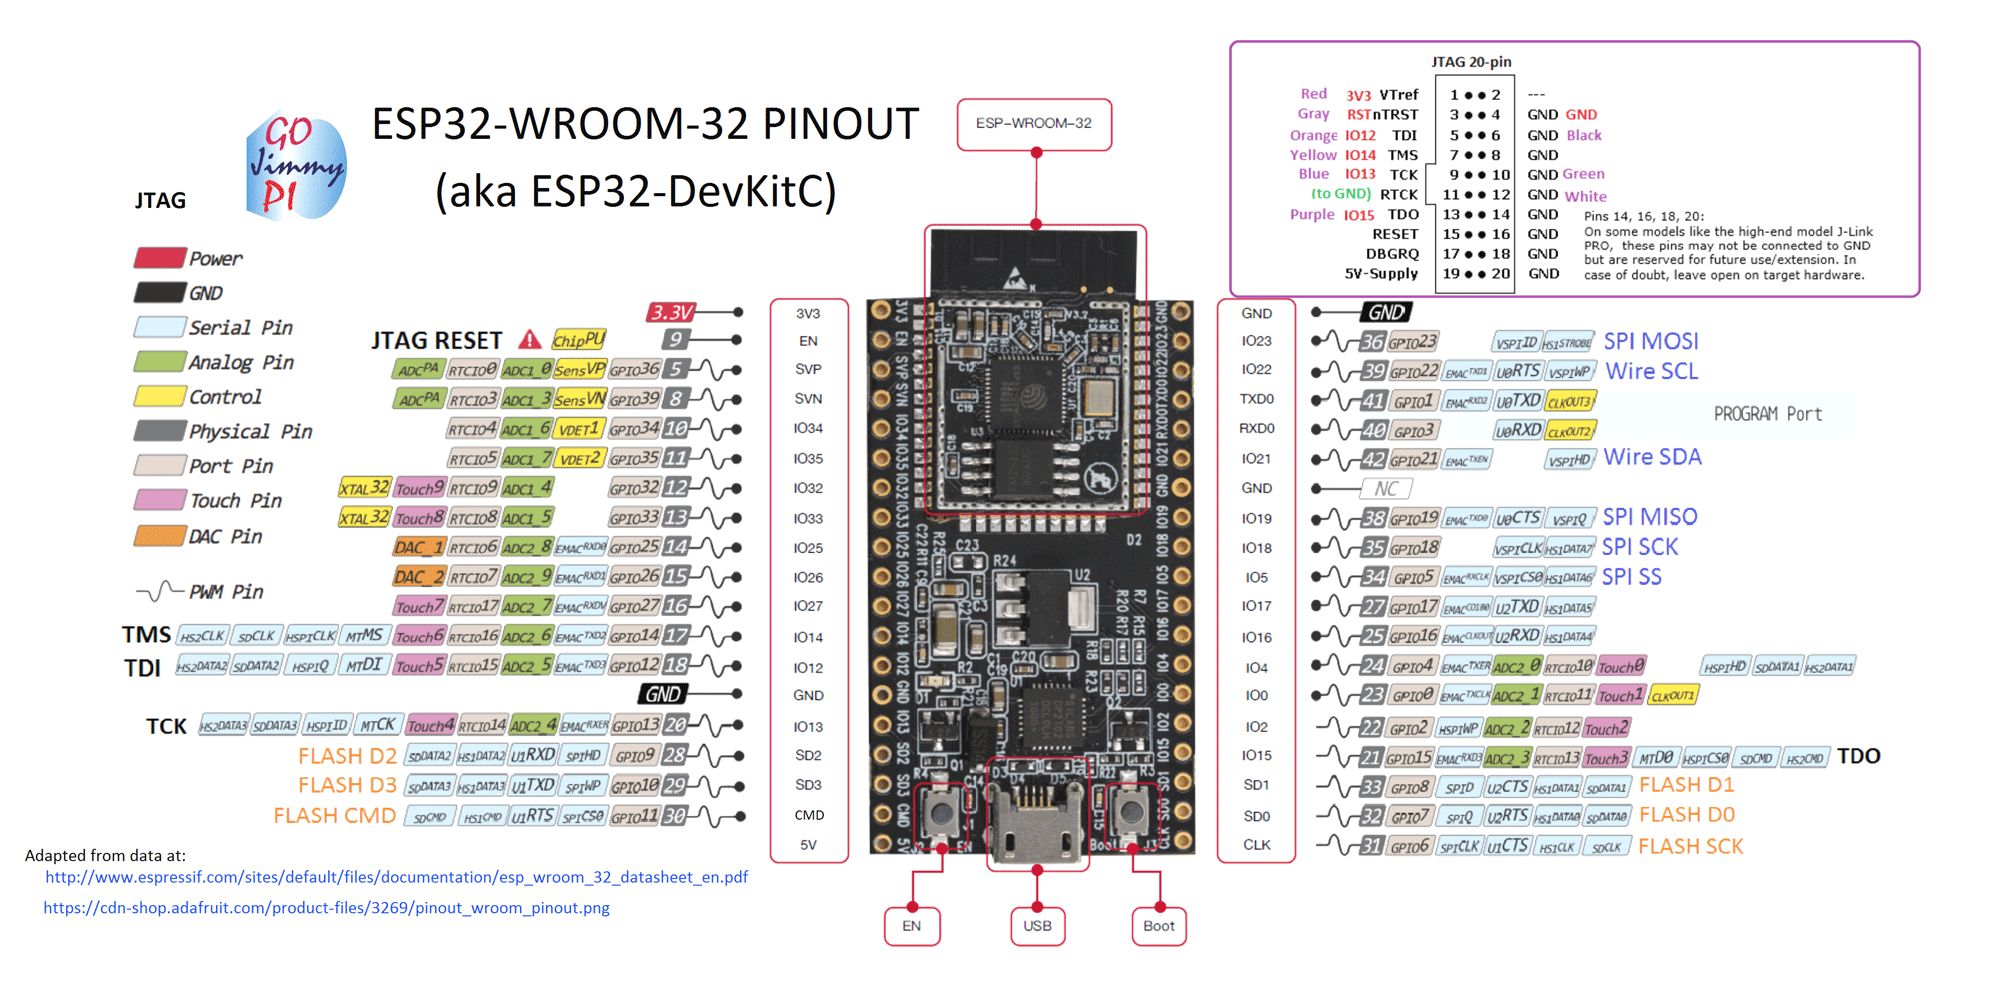
| ESP32 Dev Module | Main microcontroller | Pinout Reference |
| ST7735S Display | 1.8" TFT 128×160 pixels | - |
| USB Cable | For programming | - |
| Jumper Cables | Male-to-male connectors | - |
| Breadboard | For prototyping | - |
Software Dependencies
Development Environment
- PlatformIO - Advanced IDE for embedded development
- VS Code - Code editor with PlatformIO extension
Frameworks & Libraries
- ESP32 Arduino Framework - Arduino support for ESP32
- LVGL v7.10.0 - Graphics library
- lv_arduino v2.1.5 - Arduino port of LVGL
- TFT_eSPI v2.3.59 - TFT display driver
- SdFat v2.0.4 - SD card support
- lv_examples v7.10.0 - LVGL demo examples
Tip: Install libraries directly from PlatformIO's library manager for easier dependency management.
Version Notice: These specific versions have been tested and verified to work together. Using different versions may cause compatibility issues.
Project Overview
This tutorial demonstrates how to create modern, touch-responsive user interfaces on embedded systems using:
- ESP32 microcontroller for processing power and WiFi connectivity
- LVGL graphics library for beautiful, responsive UIs
- ST7735S TFT display for visual output (128×160 landscape mode)
Key Features
- Modern, mobile-like UI components
- Touch support and smooth animations
- Low memory footprint optimized for microcontrollers
- Cross-platform compatibility
Previous Attempts & Lessons Learned
Adafruit TFT Library Issues: Initial attempts with Adafruit's TFT library encountered breaking changes and compatibility problems.
Solution: Switched to the generic TFT_eSPI library which provides better stability and broader display support.
What You'll Learn
Step 1:Create a new project in platformIO and Do the connection of the esp32 with the st7735s as follows:
| Sl No. | ST7735s | ESP32 | Description |
|---|---|---|---|
| 1. | LED | 5v | LED Source |
| 2. | SCK/TFT_SCLK | 18 | Clock(SPI) |
| 3. | SDA/TFT_MISO | 19 | DATA (SPI) |
| 4. | A0/DC /TFT_DC | 25 | Data Command control pin |
| 5. | RESET /TFT_RST | 4 | Reset pin |
| 6. | CS /TFT_CS | 26 | Chip select control pin |
| 7. | GND | GND | Ground |
| 8. | VCC | 5v | Display source |


Step 2: * Now do the following setup in the downloaded library as in my case i used PlatformIO so i will go to :{your platformIO project name}/.pio/libdeps/esp32dev/TFT_eSPI/User_Setup.h
and for the Arduino IDE go to /home/{USERNAME}/Arduino/libraries/TFT_eSPI/User_Setup.h
 1    #define ST7735_DRIVER
 2    #define TFT_RGB_ORDER TFT_RGB  // Colour order Red-Green-Blue
 3    #define TFT_WIDTH  128
 4    #define TFT_HEIGHT 160
 5    #define ST7735_GREENTAB
 6    #define TFT_MISO 19
 7    #define TFT_MOSI 23
 8    #define TFT_SCLK 18
 9    #define TFT_CS   26  // Chip select control pin
10    #define TFT_DC    25  // Data Command control pin
11    #define TFT_RST   4  // Reset pin (could connect to RST pin)
12    #define LOAD_GLCD   // Font 1. Original Adafruit 8 pixel font needs ~1820 bytes in FLASH
13    #define LOAD_FONT2  // Font 2. Small 16 pixel high font, needs ~3534 bytes in FLASH, 96 characters
14    #define LOAD_FONT4  // Font 4. Medium 26 pixel high font, needs ~5848 bytes in FLASH, 96 characters
15    #define LOAD_FONT6  // Font 6. Large 48 pixel font, needs ~2666 bytes in FLASH, only characters 1234567890:-.apm
16    #define LOAD_FONT7  // Font 7. 7 segment 48 pixel font, needs ~2438 bytes in FLASH, only characters 1234567890:-.
17    #define LOAD_FONT8  // Font 8. Large 75 pixel font needs ~3256 bytes in FLASH, only characters 1234567890:-.
18    //#define LOAD_FONT8N // Font 8. Alternative to Font 8 above, slightly narrower, so 3 digits fit a 160 pixel TFT
19    #define LOAD_GFXFF  // FreeFonts. Include access to the 48 Adafruit_GFX free fonts FF1 to FF48 and custom fonts
20
21    // Comment out the #define below to stop the SPIFFS filing system and smooth font code being loaded
22    // this will save ~20kbytes of FLASH
23    #define SMOOTH_FONT
24    #define SPI_FREQUENCY  27000000
25    #define SPI_READ_FREQUENCY  20000000
26    #define SPI_TOUCH_FREQUENCY  2500000
So either you can comment everything there and put these lines or read the file and uncomment these changes in the User_Setup.h.
Step 3: Now go to the {your platformIO project name}/.pio/libdeps/esp32dev/lv_arduino/lv_conf.h and for the Arduino IDE go to /home/{USERNAME}/Arduino/libraries/.pio/libdeps/esp32dev/lv_arduino/lv_conf.h and do the following changes :
 1#if 1 /*Set it to "1" to enable content*/
 2/* this is the setting i found by doing a lot of testing
 3otherwise the screen came to be blury you can play with
 4your optimal value if not working fine*/
 5/* Maximal horizontal and vertical resolution to support by the library.*/
 6#define LV_HOR_RES_MAX          (50)
 7#define LV_VER_RES_MAX          (50)
 8#define LV_COLOR_DEPTH           16
 9#define LV_DPI                   114     /*[px]*/
10#define LV_TICK_CUSTOM           1
11#define LV_USE_USER_DATA         1
12// and do not cnange the rest of the file
Step 4: Now go to the {your platformIO project name}/.pio/libdeps/esp32dev/lvgl/lv_conf_template.h and for the Arduino IDE go to /home/{USERNAME}/Arduino/libraries/.pio/libdeps/esp32dev/lvgl/lv_conf_template.h and do the following changes :
- First change the name of the file from
lv_conf_template.htolv_conf.h - Now do the following changes to the file:
1#if 1 /*Set it to "1" to enable content*/
2/* Maximal horizontal and vertical resolution to support by the library.*/
3#define LV_HOR_RES_MAX          (128)
4#define LV_VER_RES_MAX          (160)
5#define LV_COLOR_DEPTH           16
6#define LV_DPI                   114     /*[px]*/
Step 5: Now open a new file in PlatformIO from the src folder like main.cpp or in the ArduinoIDE open up a new file and put this content.
 1#include <Arduino.h>
 2#include <lvgl.h>
 3#include <TFT_eSPI.h>
 4#include <lv_examples.h>
 5
 6TFT_eSPI tft = TFT_eSPI(); /* TFT instance */
 7static lv_disp_buf_t disp_buf;
 8static lv_color_t buf[LV_HOR_RES_MAX * 10];
 9
10#if USE_LV_LOG != 0
11/* Serial debugging */
12void my_print(lv_log_level_t level, const char * file, uint32_t line, const char * dsc)
13{
14    Serial.printf("%s@%d->%s\r\n", file, line, dsc);
15    Serial.flush();
16}
17#endif
18
19/* Display flushing */
20void my_disp_flush(lv_disp_drv_t *disp, const lv_area_t *area, lv_color_t *color_p)
21{
22    uint32_t w = (area->x2 - area->x1 + 1);
23    uint32_t h = (area->y2 - area->y1 + 1);
24    tft.startWrite();
25    tft.setAddrWindow(area->x1, area->y1, w, h);
26    tft.pushColors(&color_p->full, w * h, true);
27    tft.endWrite();
28    lv_disp_flush_ready(disp);
29}
30
31void setup()
32{
33    Serial.begin(115200); /* prepare for possible serial debug */
34    lv_init();
35
36#if USE_LV_LOG != 0
37    lv_log_register_print_cb(my_print); /* register print function for debugging */
38#endif
39
40    tft.begin(); /* TFT init */
41    tft.setRotation(1); //for landscape
42
43    lv_disp_buf_init(&disp_buf, buf, NULL, LV_HOR_RES_MAX * 5);
44
45    /*Initialize the display*/
46    lv_disp_drv_t disp_drv;
47    lv_disp_drv_init(&disp_drv);
48    disp_drv.hor_res = 160;
49    disp_drv.ver_res = 128;
50    disp_drv.flush_cb = my_disp_flush;
51    disp_drv.buffer = &disp_buf;
52    lv_disp_drv_register(&disp_drv);
53
54		/* Try an example from the lv_examples repository
55		 * https://github.com/lvgl/lv_examples*/
56		lv_ex_btn_1();
57}
58
59void loop()
60{
61    lv_task_handler(); /* let the GUI do its work */
62    delay(5);
63}
Step 6: Now upload the program to your ESP32. Here is the content of platformio.ini file:
 1[env:esp32dev]
 2platform = espressif32
 3board = esp32dev
 4framework = arduino
 5lib_deps =
 6	lvgl/lv_arduino@2.1.5
 7	bodmer/TFT_eSPI@^2.3.59
 8	greiman/SdFat@^2.0.4
 9	lvgl/lvgl@^7.10.0
10	lvgl/lv_examples@^7.10.0
Conclusion: The whole output should look something like this:

1#define LV_HOR_RES_MAX          (100) or //10
2#define LV_VER_RES_MAX          (100) or //10

Help in improving the guide
Thanks Futuristic Labs Pvt. Ltd. for providing me the resources of the project. Please if you find any useful improvement feel free to contact at : @pranav083 or comment below.